|

General
The Origin of the Famous Norton Featherbed Frame
Hope for Norton Fiberglass Fuel Tanks
Witworth or
Withworthless
A Sidecar Primer
The Best of the Best in Texas
Return to Library Contents
The Norton featherbed frame was created around an old fashioned long stroke single
cylinder engine with a very top heavy cylinder head. The size of this engine dictated the
space between the top and bottom rails of the full duplex cradle. In retrospect the result
of this early effort enabled all kinds of engines using all kinds of configurations to be
installed ion to this versatile and robust frame. Originally, it came with a bolt on rear
sub frame which eventually got welded up particularly when the bolts came loose. Over time
there where 3 major versions of the frame. These 3 major groups came in the bolted and
welded variety.
a. The Manx racer in Reynolds 531 chrome moly.
b. The single overhead cam International in grade A mild steel.
c. The Dominator twin frames in grade B mild steel.
Then there where 2 subdivisions in category a. 16 gauge tube for the 500cc and the 17
gauge tube for the 350cc. Tube gauge is important so don't go putting a 500 in a 350
frame.
Then in category c.. in about 1959 or 1960, Norton put the old single cylinder Model 50
(350cc) and the ES2 (EaSy2, 500cc) into the featherbed to rationalize frame production. As
you can see there where quite a few variations on what looked to be the same frame. Intact
they came off the same jig. 1960 was the year the top rails where installed at the rear of
the tank. This wasn’t just an Atlas mod, it was across the board. At the same time
the tank design and its badges where changed.
Edited from the Internet
Tanks For the
Memories or Hope For Norton Fiberglass Fuel Tanks
There are three main requirements for a successful sealing job:
1. The most important requirement for sealing a fiberglass tank is to start with
a solid tank. If there are any soft spots they must be removed and replaced with new
fiberglass. If you're not into high-speed grinders and polyester resins then you're better
off chucking the tank and looking for something better to start with.
2. The second requirement is that the inside of the tank must be extremely
clean. Everyone has a different process for cleaning the following is know to work.
3. The third requirement is that the sealer used must be compatible with the
fuel types to be used in the tank. Not all tank sealers are compatible with fuels
containing non oil-based compounds. Specifically, some sealers can be dissolved by very
small amounts of alcohol such as is added to gasoline during the winter. (These are
commonly called oxygenated gasoline.) Some products such as 3M's 776 sealer appear to be a
good industrial-grade solution to the problem however, upon closer examination, the main
solvents listed are all alcohol. 3M's technical assistance people say that small amounts
of alcohol turn the 776 sealer into a big gummy ball.
One important point to remember about any product sold as a tank sealer is that they do
not cure to a hard state. You could use a polyester resin to slosh inside the tank and in
effect build up a gelcoat layer inside the tank but this would dry to a brittle hardness
and could crack if the tank flexes. Consequently most tank sealers air dry to a vinyl-like
plastic coating.
There is a product recommended by the marine and aircraft people called Randolph
Products 912 Alcohol Resistant Sloshing Sealer. This is available from aircraft repair
places. Cost is reasonable and is a good sticky industrial product full of all you
favorite aromatic carcinogenic solvents: MEK, toluene, cyclohexanone and xylene. (needless
to say that you might not want to use this in the house)
The application procedure recommended follows:
1. Drain tank and remove cap and petcocks.
2. Rinse several times with hot water and dish detergent. Throw in a handful of pea
gravel with a little soapy water and shake the tank well so that the gravel scours all the
internal surfaces and loosens up any residues. Rinse several times until all the soap is
out of the tank.
3. Seal the tank drain holes with small cork stoppers and pour in a quart or so of
white gas (Coleman stove fuel) Slosh this around and let it sit for 30 minutes to remove
any fuel dyes in the tank. Drain and let the tank air dry for at least 30 minutes.
4. Pour approximately 1 quart of MEK into the tank and slosh it around. Seal the tank
and let it sit for one to two hours. Put a handful of clean pea gravel in again and shake
vigorously. If the tank has been sealed previously, the MEK should soften any remaining
sealer and the gravel should loosen it. Drain the tank.
5. Remove the gravel. If it has loosened any crud, pour in more clean MEK and gravel
until no more residue comes out.
6. Make certain that all bits of gravel are removed from the tank. You may have to
reach in the filler hole and pull out the last few pieces with your fingers. If your
fingers are not small enough, you can shake the remaining gravel over to the filler hole
side and use a vacuum cleaner with a crevice attachment to suck up the last bits. (Don't
do this while there are still flammable vapors in the tank .)
7. If there are still little bits of crusties coming out, keep flushing the tank with
MEK or acetone until the liquid comes out clear.
8. In between filling the tank with the solvents flush it with lots of hot water. It's
cheaper than MEK or acetone.
9. Finally, after the last rinse and when the inside of the tank is dry, plug the
petcock holes with clean cork stoppers.
10. Pour in the quart of sealer and seal the filler hole by laying a piece of plastic
across the opening and closing the cap on top of it (a plastic sandwich bag of the heavier
kind works here). If you don't want to ruin your paint, make absolutely certain that you
have the tank well sealed since it will build up pressure as you slosh the sealer.
11. Shake and rotate the tank so that the sealer coats all internal surfaces and then
drain the excess into a proper bucket. Pour the excess back into the can since it can be
reused.
12. Allow the tank to drain and dry with the corks removed for 30 minutes or so.
13. Repeat the sloshing process (steps 10 - 12) and let the tank dry with all openings
uncovered for at least 24 hours - longer if the temperature is less than 70 degrees. The
instructions on the sealer only say to use two coats, however if the internal surfaces are
very rough do it about 4 times. Let the tank dry for a couple of weeks.
14. When you a confident that all the sealer has dried, clean the excess from the
threads in the drain holes with a small wire bottle brush or whatever else is handy, put
the petcocks back in using some Teflon pipe thread compound on the threads as a backup to
the paper gaskets, put the tank back on the bike and GO!
Edited from the Internet
Whitworth or
Withworthless
Ever wonder why the fractional sizes stamped on your Whitworth wrenches don’t
match the size of an ordinary (US) spanner? Why use a fine vs. coarse thread? Read on.
This is more than you probably ever wanted to know. But hey, this is the age of
information glut.
By Professor Charles Falco
In the 19th Century every British factory which needed to bolt something to something
else devised their own fasteners to do it. Clearly, this caused all sorts of compatibility
problems. So, along came Mr. Whitworth (I forget his first name right now) who invented a
standardized system of coarse threads (with 55 degree thread angle and rounded roots and
crests). This standardization was a Good Thing. Along with his threads came heads for the
bolts that were based on the length along the side of one flat, rather than across
the flats. Hence, there is no simple fractional number for the length across the flats,
which is why your American wrenches don't fit. The fractional number on your English
wrenches refers to the diameter of the bolt (which is 1/4", 3/8" etc. just like
in the U.S.); not to the distance across the flats (which ends up being various weird
dimensions).
Some years later the Brits decided they needed a finer pitch for some applications, so
another thread series was introduced (same 55 degrees). They also decided that the heads
were too big for the bolts, so for most applications they switched to using the next size smaller
heads. Because of this, and to add one more bit of confusion to life, one manufacturer
will mark a particular wrench (spanner) BS 3/8, while a different manufacturer will mark
the same sized wrench W 7/16. They fit the same diameter bolt.
The first thing any fledgling Brit biker learns is that his motorcycle has
"Whitworth bolts." They think this is interesting, buy a set of Whitworth
wrenches, discover these wrenches fit their bolts, and believe they now know
everything they need to know about British fasteners. Unfortunately, at this point they
know only enough to make themselves dangerous. Instead, what they should have said to
themselves is Ohmygod, what other weird and incomprehensible things have the Brits
done to the fasteners on my machine? The answer to this question is: British Standard
Whitworth (BSW)
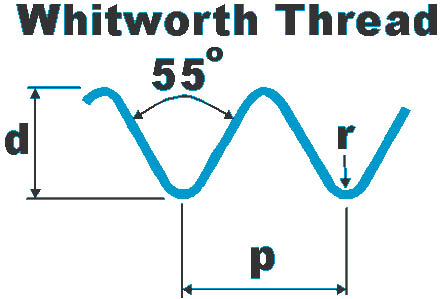
Sir Joseph Whitworth proposed this thread in 1841.
If
p = pitch of the thread
d = depth of the thread
r = radius at the top and bottom of the threads
then:
d = 0.640327 p
r = 0.137329 p
These are the original, 19th Century, coarse-threaded industrial bolts designed to hold
locomotives together. Because of their coarse pitch, they are more prone to vibrating
loose, so are little used on motorcycles. Except for threading into Aluminum (e.g.
crankcase studs), where a coarse thread is less prone to stripping than a fine one. It
turns out that, except for 1/2" (where the Brits use 12 tpi, and the Americans 13
tpi) the thread pitches are the same as for American Unified Coarse (UNC). However, the
thread form is different; Whitworth = 55 degrees; UNC = 60 degrees. In spite of
this, mismatched nuts and bolts mate nicely, so you're likely to find UNC bolts or studs
where BSW should have been.
British Standard Fine (BSF)
A finer pitch series, analogous to the American Unified Fine (UNF), although (unlike
the case of BSW/UNC) with none of the pitches in common with UNF. Many motorcycle
manufacturers commonly used a lot of BSF threads.
CEI (Cycle Engineers' Institute) or BSC (British Standard Cycle)
These are different names commonly used for the same threads. 60 degree thread angle,
rather than the 55 degree of BSW and BSF. For sizes from 1/4" through 1/2" by
far the most common are 26 tpi, although 24 tpi appear as well. most but by no
means all, fasteners on post-War BSA's (through the late '60's, when it got more
complicated) were CEI. Although the thread form and pitch is different, the head sizes on
CEI-threaded fasteners use the same wrenches as BSW/BSF.
British Association (BA)
47-1/2 degree thread angle. This is a metric thread system devised by the British for
small screws used in components like speedos. Not metric like you might expect, but with
diameters determined by a factor proportional to a power of the logarithm to the base 10
of the thread pitch in millimeters. I couldn't possibly be making this up. Ah, the
English. You'll find lots of BA threads on any British bike, but only for fasteners
smaller than 1/4". BA fasteners have their own set of wrench sizes. Typically, a set
of Whitworth sockets will include a 0BA (and maybe a 2BA….bigger number = smaller
size) socket.
British Standard Pipe (BSP)
A tapered, self-sealing thread system used to seal fluids (interestingly, the US and
the metric world standardized on the BSP system for threading all their pipes).
UNF and UNC
In the late 1960's, when even the U.S. was thinking of going metric, the giant BSA
corporation decided it was finally time to scrap that old 19th Century Whitworth-based
system, and switch to....yes, you guessed it, American. Since they had lots of money
invested in tooling, the switch wasn't made suddenly (or completely), so bikes from the
late '60's and later had a mix of all sorts of thread forms. Typically, engine internals
(e.g. the thread on the end of a camshaft) stayed with whatever form it used to have,
while simple fasteners (e.g. holding the fenders on) switched to UNF.
None of the Above
While the above systems account for well over 95% of all threads you'll ever run across
on a British bike, some manufacturers—again BSA springs to mind, but others were
guilty as well--couldn't restrain themselves from inventing a few oddball pitches of their
own. This is why, when dealing with British bikes, you should assume nothing. You must
have a pitch gauge and calipers.
Reprinted from the Internet
by Karl J.W. Brohan
For those of you who have ever fantasized about piloting a sidecar rig,
here are a few pointers which I have arrived at through practical experience. The
following discussion relates to cars mounted on the right side of the motorcycle.
Because the sidecar weight is not located over the Center of Gravity
(CG) of the motorcycle there is a yaw reaction about the vertical axis in reaction to
acceleration or deceleration forces.
Under acceleration the rig pulls right.
Under deceleration the rig pulls left.
These seemingly annoying characteristics can be used to enhance
cornering capability.
Right Turns
When attacking a right turn:
Decelerate prior to curve entry.
At the apex of the curve, roll on throttle and the sidecar will pull to
the right reducing pressure on the handlebars and the tendency of the car to roll around
the longitudinal axis.
WARNING!
Entering a right hand curve with a great excess of speed will cause the
sidecar to "fly" and attempt to roll counter-clockwise about the motorcycles
longitudinal axis.
WARNING!
Attempting to apply moderate to heavy braking in a right hand curve will
exacerbate the situation and the sidecar will continue to roll. An additional vector will
attempt to throw the weight of the car over the front wheel. This dramatically increases
steering effort and instability while the car is airborne. The rear wheel of the
motorcycle will unload and there is a possibility of the front wheel slamming against the
stop with highly unpleasant results. (A sidecar end!)
DISCRETION IS DEFINITELY THE BETTER PART OF VALOR WHEN ATTACKING A RIGHT
HAND CURVE!!!
Best tactic for entering a right-hander too hot:
Try to stay to the inside of the corner so you have room to runout wide
if necessary to keep car from going over the critical roll angle.
Use aggressive throttle after the curve apex and during turn exit. This
will increase turn rate without increasing sidecar roll.
Left Turns
When attacking a left turn, enter the turn with trailing throttle and
light front and rear brake. (For rigs with a sidecar brake linked to the rear brake pedal,
use light front brake only.) The severity of the curve dictates the brake/throttle
position. For example, a hard left turn: use no throttle and moderate front and rear
brake.
WARNING!
Rolling on moderate or greater throttle after the apex of the curve, but
prior to the curve exit, will cause the sidecar to attempt to pull the rig off the side of
the road, possibly sliding the front wheel to the outside of the curve and into the rough!
Minimum Radius Turns
Minimum radius, slow speed turns are best accomplished with a right hand
turn. The rig will almost pivot around the sidecar wheel with minimal steering effort
required. (one to one and a half times width of the rig)
Minimum radius left hand turns are much more difficult for you and the
rig. (three to four times width of rig) This is like trying to make a slow speed left hand
turn in a heavy B-767 with the right engine shutdown!
Steering Head Wobble
Steering head wobble is normal to some extent in all sidecar rigs. This
is most likely to manifest itself when riding at slower speeds over irregular road
surfaces. Increase steering head bearing pressure or steering damper pressure (if
installed). Usually these wobbles are momentary and do not warrant tightening the steering
head bearing pressure or increasing steering damper pressure. However, if you will be
riding over an irregular surface for an extended period, I would increase bearing or
damper pressure. Be sure to relax pressure when the surface again smoothes out.
Note: for those of you wondering how to increase steering head bearing
pressure on the fly, this is only possible on bikes with a handle on the steering head
such as older BMW's.
Additional Operational Info and Tidbits
Flying the sidecar in right hand turns is great fun, but very hard on
the rear wheel and spokes. Expect to have to tighten a rear spoke occasionally or to
replace a broken spoke. Repeated showboating can crack the rim spoke nipples.
Things to get for the tool kit:
In addition to the normal tool kit and spares items, a small bottle jack
is almost mandatory to change the sidecar wheel in the event of a flat. Extra spokes and
tubes are also handy to have.
One final Warning: If the vehicle has been parked and not under
continuous surveillance, check the sidecar wheel to ensure the knock-off hub (if
installed) has not been loosened by some prankster.
As with any vehicle, treat a sidecar rig with proper respect and you
will realize many happy miles of motoring in great style!
Karl J.W. Brohan
PS Beware, Volvo station wagons seem to be totally fascinated by the
sight of a sidecar rig and have been known to stop in the middle of the road and gawk!!
The Best of the Best in Texas
From seacoasts to mile-high mountains, Texas offers a little bit of everything
including roads you'd swear were built specifically for motorcyclists. Here's the top 10,
courtesy of Todd Nunnally and the Texas members of the Honda Sport Touring Association as
reprinted from the June issue of the AMA magazine.
1. Texas Route 118 from Kent to Study Butte: Phenomenal curves, beautiful desert
scenery and rich history in southwest Texas. The northern portion runs through the Davis
Mountains, with tight twisties, smooth sweepers and the McDonald Observatory in Fort Davis
at 6,800 feet. Farther south are the Del Norte Mountains, and farther still are the open,
desert plains of the Chihuahua Desert, where you can see forever. The capper is Study
Butte and Big Bend National Park, an out-of-the-way desert mountain region filled with
unusual lava landscapes, smooth, fast sweepers and (be careful!) strict park rangers.
2. Texas Route 170 (El Camino Del Rio) to Presidio: The ghost town of Terlingue
gives way to a spectacular 50-mile ride through lush. twisting valleys, where wind-carved
red-and-purple rock rises 1,OO0 feet off the Rio Grande river in southwest Texas.
Threading through the Bofecillos Mountains formed by two ancient lava flows, the route
takes you up a 15 percent grade at one point, winding up at Fort Leaton State Historic
Site near Presidio.
3. Texas Route 16 between Liano and Bandera: Pleasant terrain with a bonus: There
is little traffic on this 100-mile bit of asphalt heaven in central Texas. Route 16 is
full of scenic elevation changes, sweepers tight switchbacks, beautiful vistas, wonderful
tree-covered tunnels and gorgeous, clear rivers that invite the occasional wading party.
Be sure to stop in Fredericksburg, where museums and quaint shops line Main Street. And
the huevos rancheros at the Old Spanish Trail Restaurant in Bandera are tops.
4. Texas FM 337, from Medina to Camp Wood, then Texas Route 55 north to Rocksprings:
A roller-coaster ride that rips up and over huge limestone karsts recalling scenes from
John Wayne movies in south central Texas You really can't go wrong picking any of the FM
(Farm-to-Market) roads in this area, but FM 337 is unquestionably among the best. Don't
miss Last Maples State Natural Area in Vanderpool.
5. Texas FM 1431, from Marble Falls to Cedar Park: This loop around the
northeast side of Lake Travis is the tightest, gnarliest, nastiest, hilliest piece of
two-lane blacktop in Texas. This amazing central-Texas road has more converts than a Billy
Graham revival. Ride it. You won't be sorry.
6. Texas Route 4, from Palo Pinto to Granbury: Starting 12 miles west of Mineral
Wells, Texas Route 4 heading south offers spectacular bluffs and scenery through the Palo
Pinto Mountains, and it twists and turns all the way to Santo in east-central Texas. Palo
Pinto Museum boasts an Old West jail and log cabins. Don't miss lunch in the Nutt House. a
historic restaurant and restored country inn dating from 1893.
7. Texas FM 390, from Burton to Independence: Save this for one of those hot days,
and you'll really appreciate the rich ice cream at the Blue Bell Creameries in Brenham in
southeast Texas. FM 390 (get a good map) east and west from Independence offers attractive
scenery and exceptional vistas. It is especially colorful around mid-April, during
bluebonnet season.
8. Texas Route 852, southeast from Winnsboro: Typical northeast Texas-lots
of piney woods, gentle hills and curves, Winnsboro was founded in 1854 and sponsors one of
Texas' best-known salutes to fall foliage, the Winnsboro Autumn Trails. Held every weekend
in October, the festival offers sightseers self-guided tours of east-Texas forest land.
9. Texas Route 224, north from Coldspring: Located between Sam Houston
National Forest and Lake Livingston in east Texas, Route 224 is made up of hilly sweepers
and great scenery. You'll need a good map to find it, and the great U.S. Forest Service
roads nearby in Sam Houston National Forest, but your search will be richly rewarded.
10. Texas Route 762. south from Richmond to Brazos Bend State Park: This open road
through southeast Texas will surprise you with nice sweepers through the lush cotton
fields of the Gulf Coast plains. The park is a must-see 4,897 acres including the Brazos
River bottomlands, beautiful live-oak woodlands draped with wild grapevines and Spanish
moss, and oxbow lakes and marshes.
Disclaimer: The following information has been collected from various
sources on the Internet and publications for the expressed purpose of providing NTNOA
members with useful information for the enjoyment, maintenance & preservation of old
British & European motorcycles. While the information is intended to be as accurate as
possible it can not be guaranteed to be 100% correct, therefore the reader should use good
common sense and safety before implementing any of the suggestions and ask questions if in
doubt.
Copyright © 2000 NTNOA All rights reserved.
Revised: January 05, 2018
.
|