|
Suspension Tuning:
Preload
by Dean Baker
Although we are an
association of vintage motorcycle enthusiasts, most of us have a “modern” bike
or two. Suppose I were to tell you that you could improve the
performance of your motorcycle with no greater investment than a half hour
with a couple of friends. Well, it’s true. For most of us an
increase in the performance of our machine is just a few minutes and zero
dollars away, plus it even “personalizes” the bike to its rider, and we all
know that’s a good thing. So, let’s talk suspension.
All of us know that power
means nothing unless you can get it to the ground. Today’s tires are
remarkable in their ability to shoulder that responsibility, along with
cornering, stopping, and a host of other functions. Your bike’s
suspension is responsible for keeping tires in contact with the ground so that
they can do their job. The suspension must accomplish this task over a
wide spectrum of road conditions, while simultaneously giving you a
comfortable ride. On the majority of modern motorcycles this is
accomplished at the front by forks with internal springs and damping, and at
the rear by a shock with an external spring. There are varying degrees
of adjustability on these components, ranging from preload-only on less
expensive parts to fully adjustable compression and rebound damping on the
more high-end components. For our purposes here we are only going
to address preload, as it is applicable to most bikes and is the first place
to start in dialing in your suspension.
First, let’s begin with a few
definitions. Anyone who has taken a fork apart knows that the
springs within the fork tubes are under compression, even when the tube has
been removed from the bike. This is “preload” and simply means
the compression the spring is under when the suspension is not subjected to
any weight. Preload is typically adjusted on the forks by a threaded
adjuster on the cap, and on the rear shock by lock rings or a ramp-type
adjusting collar. On some bikes, the early Suzuki SV650 for example,
there is no external adjuster on the fork and adjusting preload requires
changing the length of spacers between the spring and fork cap.
By adjusting the preload, we
adjust the “sag” of the bike on its front and rear suspension
components. Sag is the distance the bike settles on its suspension when
subjected to load. The term “free sag” is used to express the
compression of the suspension under the weight of the bike alone. Free sag
assists in preventing your suspension from topping out as the fork unloads
toward full extension. Without it, the suspension would have
insufficient upward travel with which to work. “Static sag” is
used to express compression from full extension when the rider is on board.
Sometimes this is also referred to as “race sag”. Do not read too
much into the word “race”. Race sag does not strictly mean the
correct sag for racing purposes. Rather, the terms “race” or “static”
sag refer to the suspension travel achieved when the motorcycle is laden with
rider(s), riding apparel, and any luggage and/or gear. Let me
mention at this point that, depending on the source, these terms are not
absolute and are sometimes interchanged. The term used is not as
important as the concept.
Before we can accurately set
our bike’s sag, we need to determine the amount of “stiction” front and
rear. Static friction, or stiction, reduces your suspension’s
ability to do its job. Stiction is the resistance to smooth,
friction-free travel of your forks or shock. Since we don’t live in a
friction-free world, some degree of stiction is always present, but in can be
compounded. On the front it can be exacerbated by fork misalignment
resulting from an over tightened axle nut, tweaked triple clamps, torqued
fenders or incorrect preload. On the rear shock it is typically a
smaller number and, when excessive, is usually caused by linkage problems.
The amount of stiction should
be determined before setting sag. To determine stiction, have your
assistants lift the front of the bike to the full extension of the fork and
hold it there. Measure from the base of the triple clamp to a convenient
point on the slider. See Figure 1.
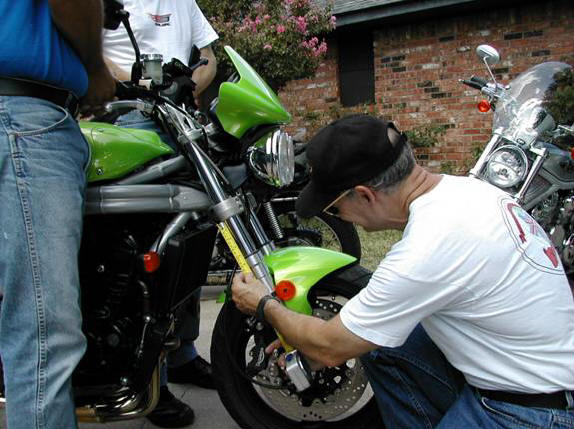
Figure 1: Measuring fork travel at full extension.
A tape measure with markings in millimeters makes the
measurements and the math much easier. Also, a centerstand may assist in
this particular measurement. Any point on the slider will do, for
example the dust ring or rock guard, just be consistent. Record this
measurement as “A”. You may also obtain this value from your owner’s
manual if you have stock components.
Next, with an assistant
steadying the bike, lower the front end so the suspension is supporting the
full weight of the bike, no center or side stands. Lift the front end
slightly and release slowly. This allows the sliders to find a “normal”
amount of extension. Measure again, using the same points, and label
this as “B”. Now, press down on the front of the bike to compress the
forks and again gently release. Measure using the same reference points
as before, labeling this measurement as “C”. The difference
between “C” and “B” is the stiction, and is simply caused by friction in the
components not allowing the fork to return to the exact same place in its
travel. Some stiction is inevitable because of the fork seals, and on a
modern bike anything less than a 10mm value on the forks is pretty good.
More than that and you should investigate the cause.
Repeat the process for the
rear shock, lifting the tail section full extension to get “A”, lifting again
slightly and lowering gently to get “B”, and compressing to get “C”.
Again, the points of measurement are not as critical as consistency, but avoid
using the bodywork as a reference point as it might flex somewhat during the
measurement process, throwing off your numbers. Consider using the axle
nut for the lower point and a solid spot on the subframe directly above the
axle for the upper. The difference between “B” and “C” on the rear
should be less than 5mm. See Figure 2.
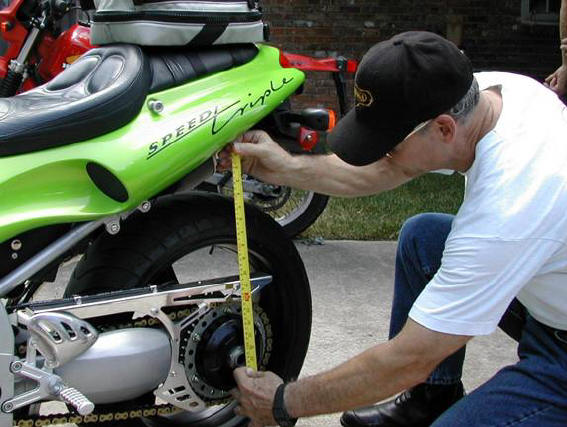
Figure 2: Measuring stiction on rear.
Once satisfied that stiction
is acceptable, we can set the proper static sag. This is done with the
rider in his gear, sitting feet on the pegs in a normal riding position.
While a helper holds the bike steady, other assistant repeats the same
measurements as before, using the same reference points. See Figure 3.
As in determining stiction, measure for B and C
using the extend-release, compress-release method, then add B + C and divide
the sum by 2. This is to average out stiction in the suspension travel. This
value is subtracted from “A”, the suspension at full extension, to provide
static sag. You can calculate the approximate sag you are looking for before
you start measuring. Generally, static sag should equal 25%-30% of the full
travel of the fork or shock (get the total travel from your owner’s manual),
with 25% being better for the track or aggressive sport riding, 30% better for
general street use. As an example, say your rear shock has a range of travel
of 125mm and you are planning on street use. Multiplying 125mm by 30% gives us
37.5mm as a good baseline for static sag. If you can’t find specifications for
your suspension’s range of travel, you can use 30-35mm for street, (25-30mm
for the track) as a starting point. Front and rear sag should be about the
same.
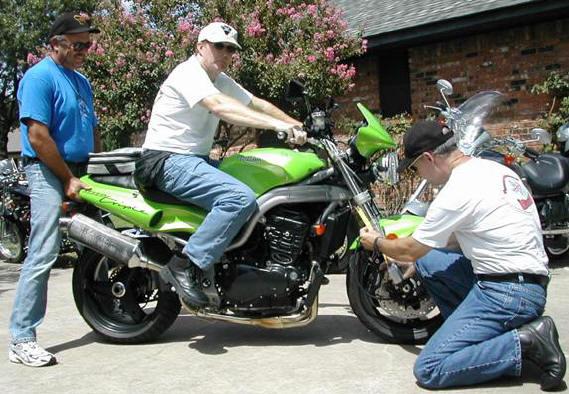
Figure 3: Measuring static sag on front.
If your numbers fall within
the proper range, you’re finished. Skip down to checking free sag.
If not, it’s time to dial in the suspension. Use the preload adjusters
on the fork caps to set the front static sag. Figure 4 shows the
preload-only adjusters on the caps of a Honda VFR Interceptor. Be
careful, these adjusters are usually aluminum and don’t react well to the
wrong tool. It’s also a good idea to protect the tank before
reaching for the wrenches and screwdrivers. Make sure both forks are
adjusted identically by counting the number of exposed rings on the adjuster.
As preload is increased, fewer rings are visible on the adjuster. One
turn of the adjuster usually equates to about 1mm change in sag. If you
don’t have adjusters on the fork caps, the caps will have to be removed and
new spacers installed between the fork caps and springs. Light aluminum
tubing or PVC pipe works well. Be sure to use quality washers of the
correct size between the spacers, caps and springs.
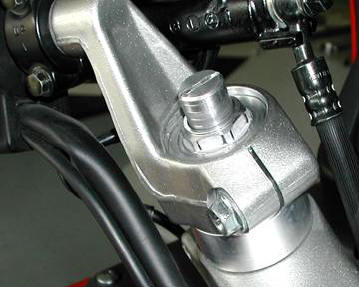
Figure 4: Preload-only adjuster on VFR
800. Note rings.
On a lock-ring type shock,
preload is adjusted by tightening or loosening the ring adjuster, shown in
Figure 5.
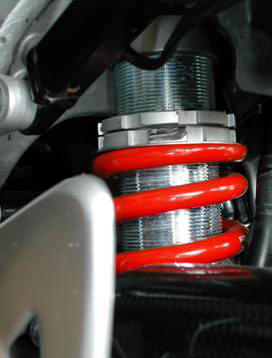
Figure 5: Lock-ring adjuster.
Note in the photo the two
rings. The top is the lock ring, which must be backed off to allow
adjustments to be made by tightening or loosening the lower ring. I have
marked the lower ring with a black marker to tell one full turn of the ring.
Generally, one complete rotation of the ring nut equates to about 1-2 mm
change in spring preload. On ramp-type shocks, shown in Figure 6,
preload is adjusted by twisting the ramped collar to a greater or lesser
value. Obviously this type of shock does not allow for the range of
adjustments that the ring-type shock does. Make your adjustments,
and then re-measure to see if you have achieved your goal.
Figure 6: Ramp-type preload adjuster.
Once
static sag is properly set, check your free sag. When static sag
is within parameters free sag should be about 5mm-10mm less than full
extension. Use the same procedures that you used to get the values for
“B” and “C” in calculating the static sag. Your original value for “A”
(full extension) is still valid, but now you measure for “B” and “C” without
the rider onboard. Record the new “extend and release” and “compress and
release” measurements, add them together and divide by two (as before, when
calculating static sag,) and subtract the result from “A” to calculate free
sag.
Here are a couple of
important items. Write down each measurement and adjustment.
You’ll be working with a lot of numbers and it is easy to get confused.
Plus, by documenting each step you have a baseline to work with as you refine
your suspension. Experimentation is encouraged. Find a familiar
twisty road for your test rides, preferably not too busy and not too smooth.
You will notice changes in the handling when you adjust your
suspension, so take it easy. Make an adjustment, document it, and go for
a ride. Evaluate and document the results. Repeat as necessary.
There is no hard and fast number for the correct amount of sag. You may
find you like more or less sag than I have recommended. No problem.
This is all about adjusting the suspension to optimize your riding
experience. Also, take the static sag measurements while approximating
the load the bike will be carrying when you ride. It isn’t absolutely
necessary to be in complete riding gear (although you do wear helmet,
boots, gloves, jacket, etc when you ride, don’t you?) Of more
importance, are you planning on carrying luggage or bags with you?
Are those bags going to have anything in them? Do you plan to ride
two-up? When measuring static sag it is imperative that you
measure the suspension under the load it will be supporting when you’re
riding.
It’s
important to understand what you’re doing while cranking down on that
adjuster. Increasing preload does not result in a stiffer spring. It
only changes the amount of load it takes to begin to compress the spring.
Spring stiffness is determined by the manufacturing process, and is usually
expressed in lbs/in or kg/cm. As an example, a 100-lb/in. spring
preloaded 2 inches will not compress further with any weight less than 200
pounds, but will compress 1 inch per 100 pounds above that. Normally,
stock springs should work well enough unless you are very light or very heavy,
or if you carry gear or ride two-up. If you find that you are near the
limits of your preload adjustments to achieve proper static sag, you may need
to consider changing your springs. Also, if your static sag is correct
but free sag is less than recommended (5-10mm) or if the suspension is
topping out, a heavier spring rate is indicated. Conversely, a lighter
rated spring may be in order if free sag is more than desired.
So, what about that performance gain I promised
at the beginning of all this? When your machine’s suspension is properly
set up for its rider and conditions, it is more capable of performing the way
it was designed. Remember, riding a motorcycle involves a series
of signals and responses between you and the road. The suspension is the
two-way conduit that transmits those signals between you and your tires.
An optimum set up allows optimum control and optimum feedback. That
equates to more confidence. Confidence allows you to fully utilize the
performance capabilities of your machine, whether it is honing your skills at
a track day or touring two-up on the back roads of the Hill Country.
I have drawn on several
sources to put this article together. I highly recommend Kevin Cameron’s
Sportbike Performance Handbook (MBI Publishing Co.) as an excellent
source of information on suspension and any other aspect of motorcycle
performance tuning. I have also used information from “Motorcycle
Consumer News” and “Motorcyclist” magazines, as well as tech notes from Race
Tech®, manufacturer of quality aftermarket suspension components. All
these sources provided outstanding information. Thanks also to Bob
Hagemann, Dicky Hunter and George Tuttle for assisting with the action shots.
Lastly, remember that motorcycling has enough risks on a properly maintained
bike. While the adjustment procedures I’ve outlined are not complex, if
you lack the mechanical skills to go wrenching on something as important as
suspension, DON’T! Get a gearhead friend to help out, or let a
pro at your local shop handle it.
A quick review of formulas:
Stiction = (A – B) – (A – C)
Static Sag = A – (B+C)/2
*
Free Sag = A – (B+C)/2 **
Where:
A = Full extension
B = Suspension Measurement after Extend and Release
C = Suspension Measurement after Compress and Release
*Suspension Measurement with Rider(s) and Gear Onboard
**Suspension Measurement with Unladen Motorcycle
Copyright © 2000 NTNOA All rights reserved.
Revised: January 05, 2018.
|