For more on this Tech Tips Vol. 8, text or call Bob at 214-636-7368 or email at
willyrobcox@gmail.com • visit at www.CustomClassicCycles.com
Suggestions and opinions presented in "Tech Tips" are provided for the benefit of clubmembers and guests. If you're not completely comfortable with performing your own mechanicing please hire a qualified shop or independent mechanic. Bob Cox/Custom Classic Cycles and the NTNOA are not responsible for accidents, property damage, injury or fatalities resulting from any information contained in "Tech Tips." • Unless otherwise stated, all graphics, photos, illustrations and copy in "Tech Tips" are the exclusive property of Bob Cox/Custom Classic Cycles • Copyright © 2019
Tech Tips Vol 2 Top
Getting and keeping those pesky Lucas indicator lights snug in their headlight shells
requires "O" rings and Dremel tool engineering...
1/4" ID on the fuel valve provides an unrestricted flow of oil and with a male and female barb on each end fits perfectly with the typical classic British oil lines
Make a cardboard template
Mount all components
Make adjustments
Replicate in mild steel
The Brit brake switch, love it or hate it, is a good choice as it's ON when NOT depressed. Cheap and plentiful but buyer beware that it's made even cheaper in some parts and they do pop their rubber tops eventually
An old Holley boat carb supplied the idea and the parts to rig the accelerator pump cam to the shaft of the Moeller fuel valve. That's why we don't throw stuff away
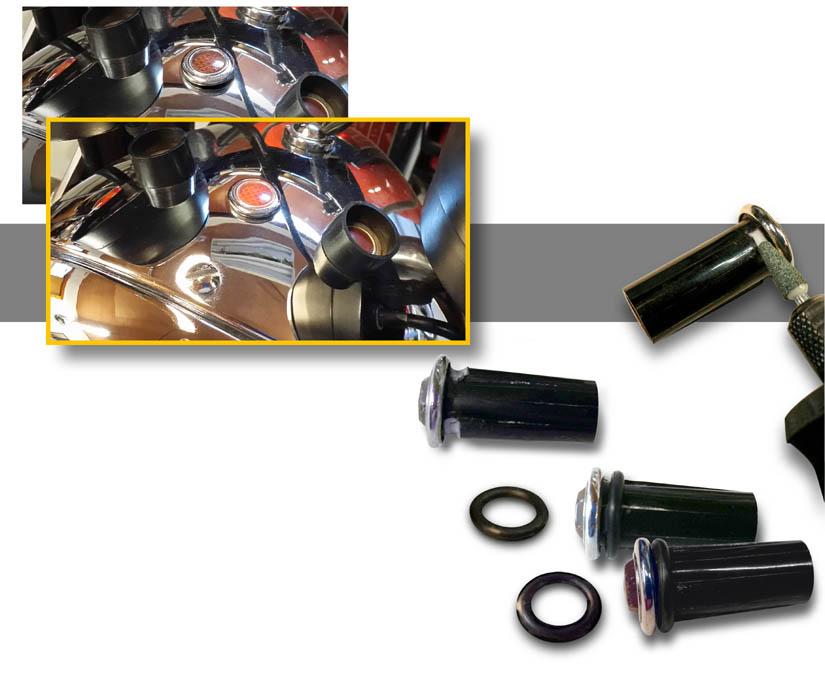
Begin by creating notches on each of the three raised ridges using a Dremel tool and the smallest of grinding attachments. Keep the notches tight to the chromed caps and go slow to prevent marring them or going too deep.
When fitting shields their extra thickness has to be accounted for by adjusting the width of the notches and/or using thicker metric or inch equivalvent "O" rings. They're just right when upon assembly into the headlight shell they want to roll into the notches and stay there, and the indicator bezel is nice and flush.
The plastic sun shields may disguise the mounting of their indicators but the exposed one can't hide the fact that it's not flush. All seems fine til you put the headlight back in and the bundle of wires that congregate there push at least one of them partially out. My past attempts to solve this have been only partly successful - silicone rescue tape, small zip ties, combinations, incantations. This "O" ring approach works best.
The retaining ridges become notched so
the "O" ring can
find its groove
A variable speed Dremel works best as you want to go slow
Leave the burrs - don't go too deep
Metric "O" ring 10mm x 15mm
x 2.5mm (thick)
The Moeller product
photo doesn't show that on the M/F valve this is
a male thread
like the barb
Moeller's 1/4" x 3/8"male/female marine petcock uses NPT tapered threads. No sealant should be needed as it's all brass
Metric "O" ring
10mm x 16mm
x 3mm or even fatter inch equivalent
Aftermarket
kits are about $16 and give lots of options
A marine 1/4 inch fuel valve, a used Holley accelerator pump cam, a 70's era brake switch and a 90 degree bracket combine to create an oil feed cutoff that gives you a green light when you're good to go...
A right angle bracket allows the fuel valve and brake switch to mount together aligning a Holley pump cam to release the switch button at just the right time
The colored plastic lenses can be renewed by polishing with aluminum polish such as Mother's. This is best done by hand with a microfiber cloth and elbow grease. The next upgrade will be to LED bulbs. Since the indicators do not use the headlight shell for their grounding they can be rewired to reverse polarity on bikes with positive ground. LED's will definitely help with daytime illumination so they may be in a future Tech Tips.
This contraption came about after seeing a friend turn his oil supply valve on before cranking his gorgeous Norton. I've heard of many ways of reminding one to turn the valve back on before starting like a key fob note.
The failure to remember is of course a toasted engine. Anti-wet sump valves can be used with same potential result.
After internet searches turned up nada, I started thinking about how one could be constructed. The biggest hurdle was finding a mechanism to physically turn a switch on and off by the fuel valve lever. A scrapped Holley 4 barrel carburetor provided a solution - a nylon accelerator pump cam designed to straddle the throttle shaft with ready made holes for securing.
Because of the larger size needed a regular fuel petcock would not suffice. Fortunately they use bigger stuff in the marine industry and the Moeller brass 1/4" by 3/8" NPT petcock is just the ticket. It also has a brass lever that can be drilled to secure the Holley accelerator pump cam shown below. You'll also need two brass 1/4" by 3/8" NPT barbs - one male and one female.
Attach the Holley cam to the valve lever by drilling a hole to align with the first tap in the pink cam. You may need to flatten out the lever slightly where the hole will be located. The brake switch slots and corresponding slots in the bracket will allow adjustment of the valve's position relative to the brake switch. Use a multi-meter for final tweaking to find the sweet spot.
I used the "pink"
cam which was on the
Holley 4 barrel donator
carb and also has the
most linear ramp. After
assembly and playing
with the contact alignment
of the cam on the Norton brake switch button, I adjusted the profile of the cam with a fine sanding drum on the Dremel. The objective was to have the switch contacts open turning off the green "go" light only AFTER the oil flow has been sufficiently restored. This is why I chose the valve lever linked cam.
My original idea was to wire the electronic ignition power through the switch so the bike would not start if the lever wasn't turned on. This is still viable as you can easily bypass the switch if it causes ignition problems on the road. Another warning light alternative is to use a common style of momentary switch that is OFF until the button is depressed. This will give you a red light when the oil valve is turned off. The weak link is the switch so use as good a one as you can find water resistant preferred.
12 volt LED warning lights are plentiful. The one illustrated below cost $6 and is 5/16" diameter. If powering ignition through switch wire the indicator light in parallel not series
Valve Closed
Valve
Open


   [Home]                                     [Site Map]

Copyright © 2000 NTNOA All rights reserved.
Revised: March 27, 2021.